Anchore Enterprise scanner reference for STO
You can scan your repositories and other components used in your code with Anchore Enterprise, a scanner that provides visibility into supply chain security risks.
Important notes for running Anchore Enterprise scans in STO
All data ingestion methods are supported
You can run Orchestration, Extraction, and Ingestion workflows with Anchore Enterprise. This topic includes an orchestratedScan pipeline example and a dataLoad pipeline example below.
Scans in air-gapped environments are supported
You can run Anchore Enterprise scans in air-gapped environments. For more information, go to the Anchore Enterprise documentation:
Docker-in-Docker requirements
Docker-in-Docker is not required for ingestion workflows where the scan data has already been generated.
You need to include a Docker-in-Docker background service in your stage if either of these conditions apply:
- You configured your scanner using a generic Security step rather than a scanner-specific template such as Aqua Trivy, Bandit, Mend, Snyk, etc.
- You’re scanning a container image using an Orchestration or Extraction workflow.
Set up a Docker-in-Docker background step
Go to the stage where you want to run the scan.
In Overview, add the shared path
/var/run.In Execution, do the following:
Click Add Step and then choose Background.
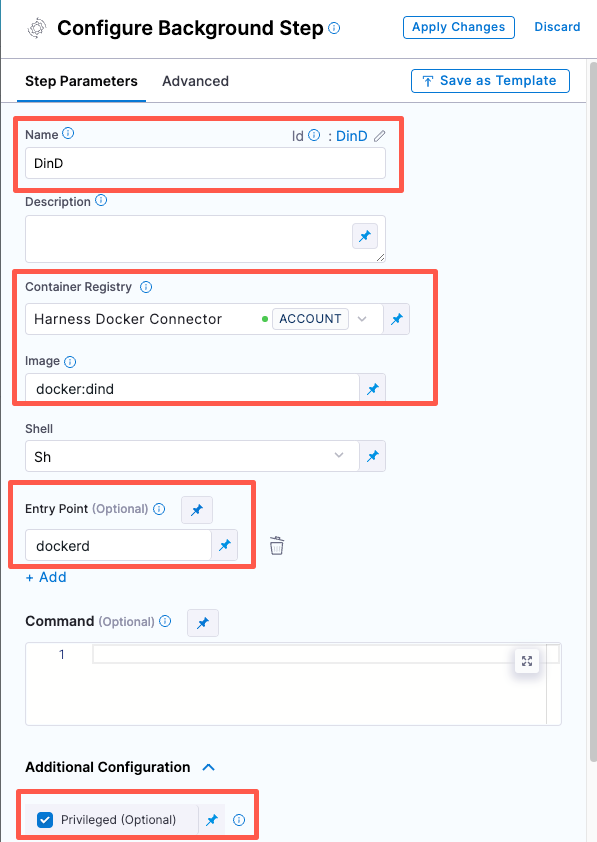
Configure the Background step as follows:
Dependency Name =
dindContainer Registry = The Docker connector to download the DinD image. If you don't have one defined, go to Docker connector settings reference.
Image =
docker:dindUnder Entry Point, add the following:
dockerdIn most cases, using
dockerdis a faster and more secure way to set up the background step. For more information, go to the TLS section in the Docker quick reference.If the DinD service doesn't start with
dockerd, clear the Entry Point field and then run the pipeline again. This starts the service with the default entry point.Under Optional Configuration, select the Privileged checkbox.
- Visual setup
- YAML setup
- step:
   type: Background
   name: background-dind-service
   identifier: Background_1
   spec:
      connectorRef: CONTAINER_IMAGE_REGISTRY_CONNECTOR
      image: docker:dind
      shell: Sh
      entrypoint:
         - dockerd
      privileged: true
You might want to increase the resource limits for your Docker-in-Docker background step. This can speed up your scan times, especially for large scans.
In the pipeline examples below, the Docker-in-Docker step has resource limits of 2048Mi and 1000m.
Root access requirements
You need to run the scan step with root access if either of the following apply:
You need to run a Docker-in-Docker background service. This is required in the following scenarios only:
You're using a generic Security step to run an Orchestrated or Extraction scan, rather than a scanner-specific step such as Aqua Trivy, Bandit, etc. (not required for Ingestion scans).
You're scanning a container image using an Orchestrated or Extraction scan (not required for Ingestion scans).
You need to add trusted certificates to your scan images at runtime.
You can set up your STO scan images and pipelines to run scans as non-root and establish trust for your own proxies using self-signed certificates. For more information, go to Configure STO to Download Images from a Private Registry.
Security step settings for Anchore Enterprise scans in STO
You need to use a Security step to set up an Anchore Enterprise integration. An Anchore Enterprise scanner template is under development and will be available soon.
/step-palette -->
To set up your Anchore Enterprise integration with a Security step, do the following:
- Create a CI Build or Security Tests stage
- Add a Security step.
- Add the following
setting:valuepairs to the Security step.
product_name:anchorescan_type:containerImageproduct_config_name=defaultpolicy_type:orchestratedScan,dataLoad, oringestionOnly.When
policy_typeis set toorchestratedScanordataLoad:product_domain: The fully-qualified URL to the scanner API, for example https://anchore.company.io/api or http://192.0.2.1:8228product_access_id: Username to log in to the scanner.product_access_token: The access token to log in to the scanner. In most cases this is a password or an API key. You should create a Harness text secret with your encrypted token and reference the secret using the format<+secrets.getValue("project.container-access-id")>. For more information, go to Add and Reference Text Secrets.
When
policy_typeis set todataLoad:product_image_name: The name of the image that you want to extract from Anchore.
When
policy_typeis set toorchestratedScan:container_project— The image owner and project, for exampleharness/delegate
tool_argsYou can use this field to run the Anchore Enterprise CLI with specific command-line arguments. For example, specifytool_args:--force.
Container image settings (required)
container_type- accepted value(s):
local_image,docker_v2,jfrog_artifactory,aws_ecr- for
container_typeset tolocalNone
- for
container_typeset todocker_v2container_access_id: Usernamecontainer_access_token: Password/Token
- for
container_typeset tojfrog_artifactorycontainer_access_id: Usernamecontainer_access_token: Password/Token
- for
container_typeset toaws_ecrcontainer_access_id: Usernamecontainer_access_token: Password/Tokencontainer_region: AWS default region
- for
- accepted value(s):
container_domain: The image owner and project, for exampleharness/delegate
Target and variant (required)
The following settings are required for every Security step:
target_nameA user-defined label for the code repository, container, application, or configuration to scan.variantA user-defined label for the branch, tag, or other target variant to scan.
Make sure that you give unique, descriptive names for the target and variant. This makes navigating your scan results in the STO UI much easier.
You can see the target name, type, and variant in the Test Targets UI:
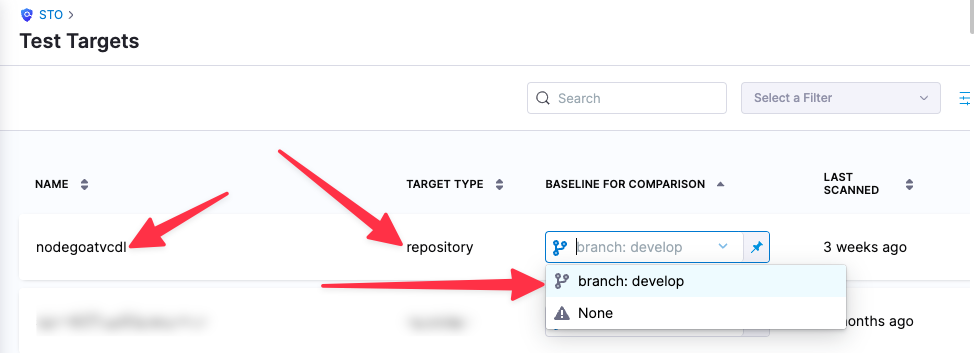
For more information, go to Targets, baselines, and variants in STO.
Ingestion file (required for ingestion workflows)
The following setting is required for Security steps where the policy_type is ingestionOnly.
ingestion_fileThe results data file to use when running an Ingestion scan. You should specify the full path to the data file in your workspace, such as/shared/customer_artifacts/my_scan_results.json.In addition to ingesting scan data in the external scanner's native format, STO steps can also ingest data in SARIF and Harness Custom JSON format.
The following steps outline the general workflow for ingesting scan data into your pipeline. For a complete workflow description and example, go to Ingest Scan Results into an STO Pipeline.
Specify a shared folder for your scan results, such as
/shared/customer_artifacts. You can do this in the Overview tab of the Security stage where you're ingesting your data.Create a Run step that copies your scan results to the shared folder. You can run your scan externally, before you run the build, or set up the Run step to run the scan and then copy the results.
Add a Security step after the Run step and add the
target name,variant, andingestion_filesettings as described above.
Fail on Severity
Every Security step has a Fail on Severity setting. If the scan finds any vulnerability with the specified severity level or higher, the pipeline fails automatically. You can specify one of the following:
CRITICALHIGHMEDIUMLOWINFONONE— Do not fail on severity
The YAML definition looks like this: fail_on_severity : critical # | high | medium | low | info | none
Anchore Enterprise orchestration example
This example uses a Security step in Orchestration mode to scan a repository. The pipeline has one SecurityTests stage with two steps:
A Background step that runs Docker-in-Docker. This is required to scan container images.
A Security step that does the following:
- Extracts the
owasp/nettacker:latestimage from Anchore Enterprise. - Logs in to the Anchore Enterprise API based on the
product_domain,product_access_id,product_access_tokensettings. - Launches an orchestrated scan of the
owasp/nettackerproject in Anchore Enterprise and gets the scan results from the Anchore server. - Deduplicates and normalizes the scan data and ingests it into STO.
- Extracts the
Anchore Enterprise dataload ingestion pipeline example
pipeline:
  allowStageExecutions: false
  projectIdentifier: STO
  orgIdentifier: default
  tags: {}
  stages:
    - stage:
        name: build
        identifier: build
        type: SecurityTests
        spec:
          cloneCodebase: false
          infrastructure:
            type: KubernetesDirect
            spec:
              connectorRef: K8S_DELEGATE_CONNECTOR
              namespace: harness-delegate-ng
              automountServiceAccountToken: true
              nodeSelector: {}
              containerSecurityContext:
                privileged: true
              os: Linux
          sharedPaths:
            - /var/run
            - /shared/customer_artifacts
          execution:
            steps:
              - step:
                  type: Background
                  name: Background_1
                  identifier: Background_1
                  spec:
                    connectorRef: CONTAINER_IMAGE_REGISTRY_CONNECTOR
                    image: docker:dind
                    shell: Sh
                    privileged: true
                    entrypoint:
                      - dockerd
                    resources:
                      limits:
                        memory: 2048Mi
                        cpu: 1000m
              - step:
                  type: Security
                  name: Security_1
                  identifier: Security_1
                  spec:
                    privileged: true
                    settings:
                      policy_type: orchestratedScan
                      scan_type: container
                      product_name: anchore
                      product_config_name: default
                      container_domain: docker.io
                      container_project: owasp/nettacker
                      container_tag: latest
                      product_domain: https://anchore.qa.harness.io/api
                      container_type: docker_v2
                      product_access_id: aubrey.klaft@harness.io
                      product_access_token: <+secrets.getValue("anchoretoken")>
                      LOG_LEVEL: debug
                    imagePullPolicy: Always
          caching:
            enabled: false
            paths: []
          slsa_provenance:
            enabled: false
        variables:
          - name: runner_tag
            type: String
            value: dev
  identifier: anchore_scan
  name: anchore scan
Anchore Enterprise dataLoad example
This example uses a Security step in Orchestration mode to scan a repository. The pipeline has one SecurityTests stage with two steps:
A Background step that runs Docker-in-Docker. This is required to scan container images.
A Security step that does the following:
- Extracts the
owasp/nettacker:latestimage from Anchore Enterprise. - Logs in to the Anchore Enterprise API based on the
product_domain,product_access_id,product_access_tokensettings. - Scans the extracted image.
- Deduplicates and normalizes the scan data and ingests it into STO.
- Extracts the
Note that in this example, the resource limages for the Security step are increased to ensure that the container used to run the scan has enough memory and CPU.
Anchore Enterprise dataload ingestion pipeline example
pipeline:
  allowStageExecutions: false
  projectIdentifier: STO
  orgIdentifier: default
  identifier: anchore_dataload
  name: anchore dataload
  tags: {}
  stages:
    - stage:
        name: build
        identifier: build
        type: SecurityTests
        spec:
          cloneCodebase: false
          infrastructure:
            type: KubernetesDirect
            spec:
              connectorRef: K8S_DELEGATE_CONNECTOR
              namespace: harness-delegate-ng
              automountServiceAccountToken: true
              nodeSelector: {}
              containerSecurityContext:
                privileged: true
              os: Linux
          sharedPaths:
            - /var/run
            - /shared/customer_artifacts
          execution:
            steps:
              - step:
                  type: Background
                  name: Background_1
                  identifier: Background_1
                  spec:
                    connectorRef: CONTAINER_IMAGE_REGISTRY_CONNECTOR
                    image: docker:dind
                    shell: Sh
                    privileged: true
                    entrypoint:
                      - dockerd
                    resources:
                      limits:
                        memory: 2048Mi
                        cpu: 1000m
              - step:
                  type: Security
                  name: Security_1
                  identifier: Security_1
                  spec:
                    privileged: true
                    settings:
                      policy_type: dataLoad
                      scan_type: container
                      product_name: anchore
                      product_config_name: default
                      product_domain: https://anchore.myorg.org/api
                      product_access_id: jane.smith@myorg.org
                      product_access_token: <+secrets.getValue("anchoretoken")>
                      product_image_name: owasp/nettacker:latest
                      target_name: owasp/nettacker
                      target_variant: latest
                      LOG_LEVEL: debug
                    imagePullPolicy: Always
                    resources:
                      limits:
                        memory: 4Gi
                        cpu: 1000m
          caching:
            enabled: false
            paths: []
          slsa_provenance:
            enabled: false
        variables:
          - name: runner_tag
            type: String
            value: dev